

Inverter/Charger, Solar Charge Controller, AC Fuse Box
The beginning of my solar quest began several months prior to implementing the project. I soon realized I needed to do a lot of research to learn how to do my own solar project. There were many questions that seemed to not get answered during my search. Folks who posted photos of their installation was most helpful.
Jack Mayers site http://www.jackdanmayer.com/ was most helpful of all the sites I visited. I did contact Jack via email a few times with questions and he was very helpful. I followed Jack's solar installation recommendations as close I could.
My system does vary from his system and others somewhat. I did this because of cost, space and component availability.
Another good site worth reading is HandyBob's Blog http://handybobsolar.wordpress.com/
Bob's site is packed with helpful information to guide you in the right direction.
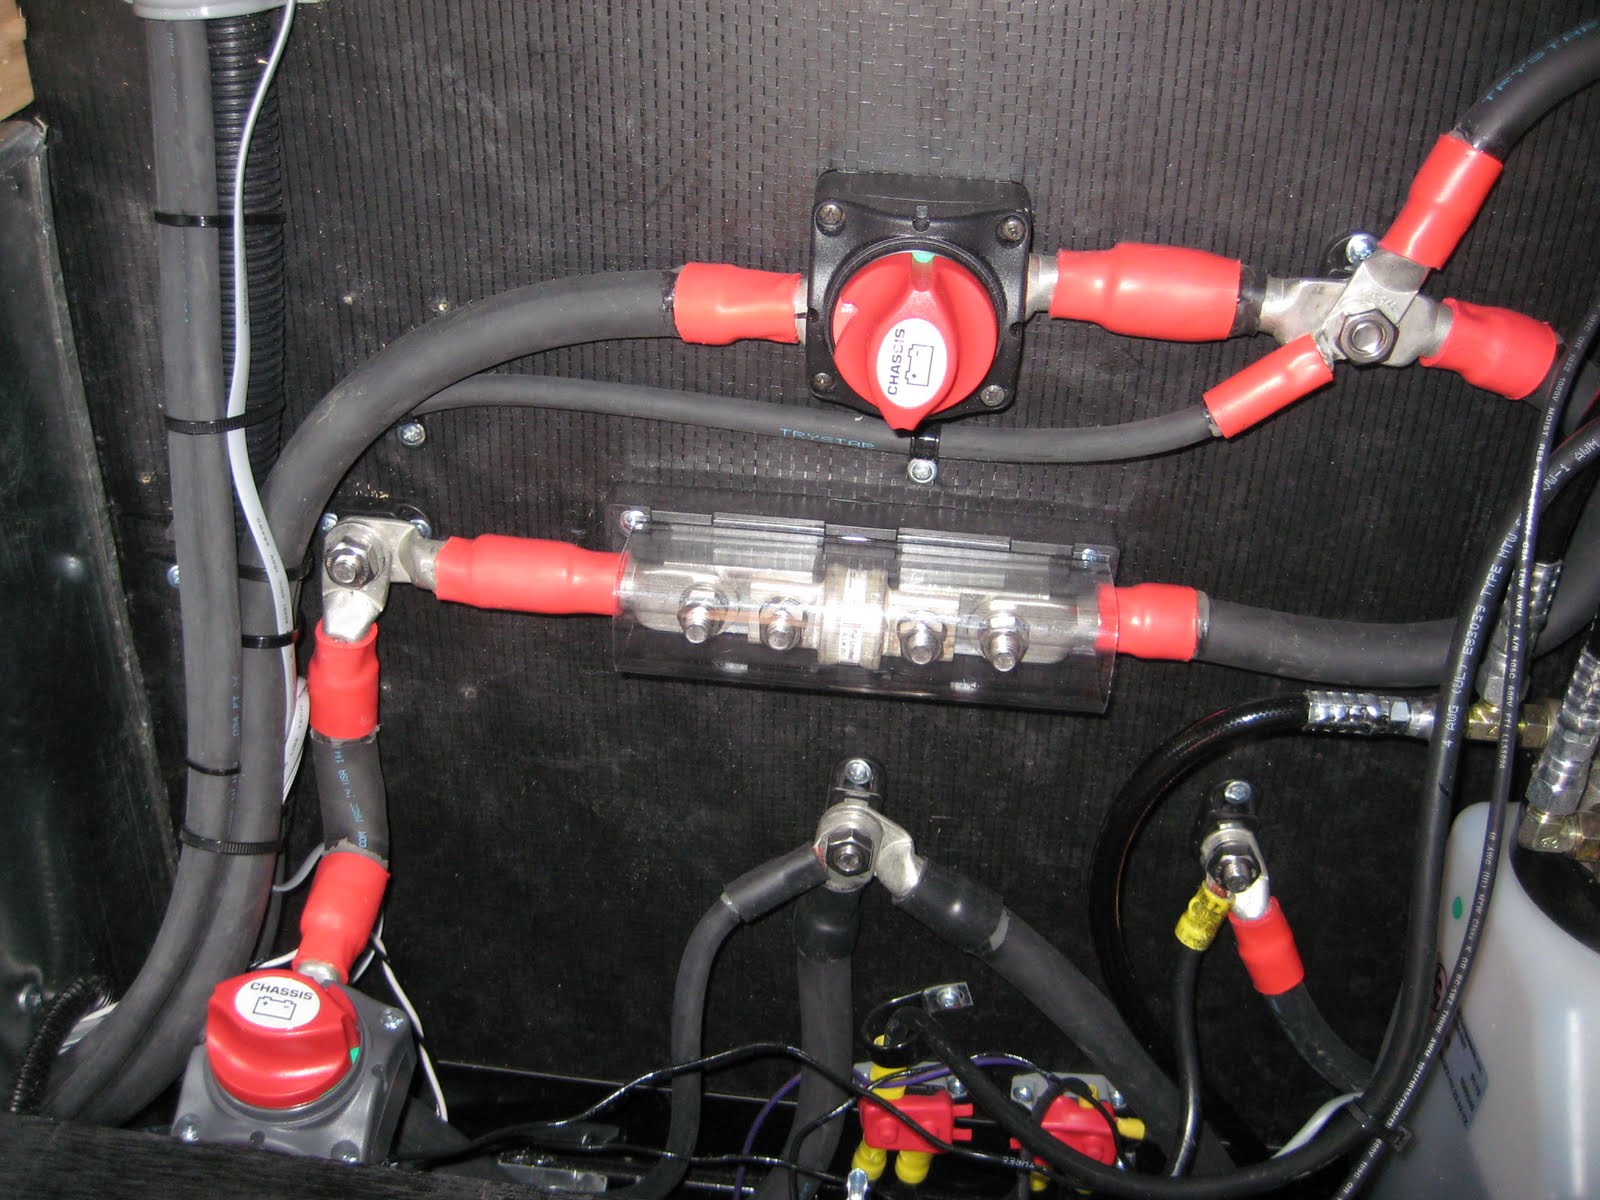 DC Cable Connections
Our Montana 3150RL has a Generator Prep option. This is a mixed blessing. It does have a 50 Amp Auto Switch which is handy if I wanted to add a generator. It also is handy because I chose to use flooded lead acid 6 Volt golf cart batteries. The batteries can be kept in a separate bay from the Solar Controller and the Inverter/Charger.
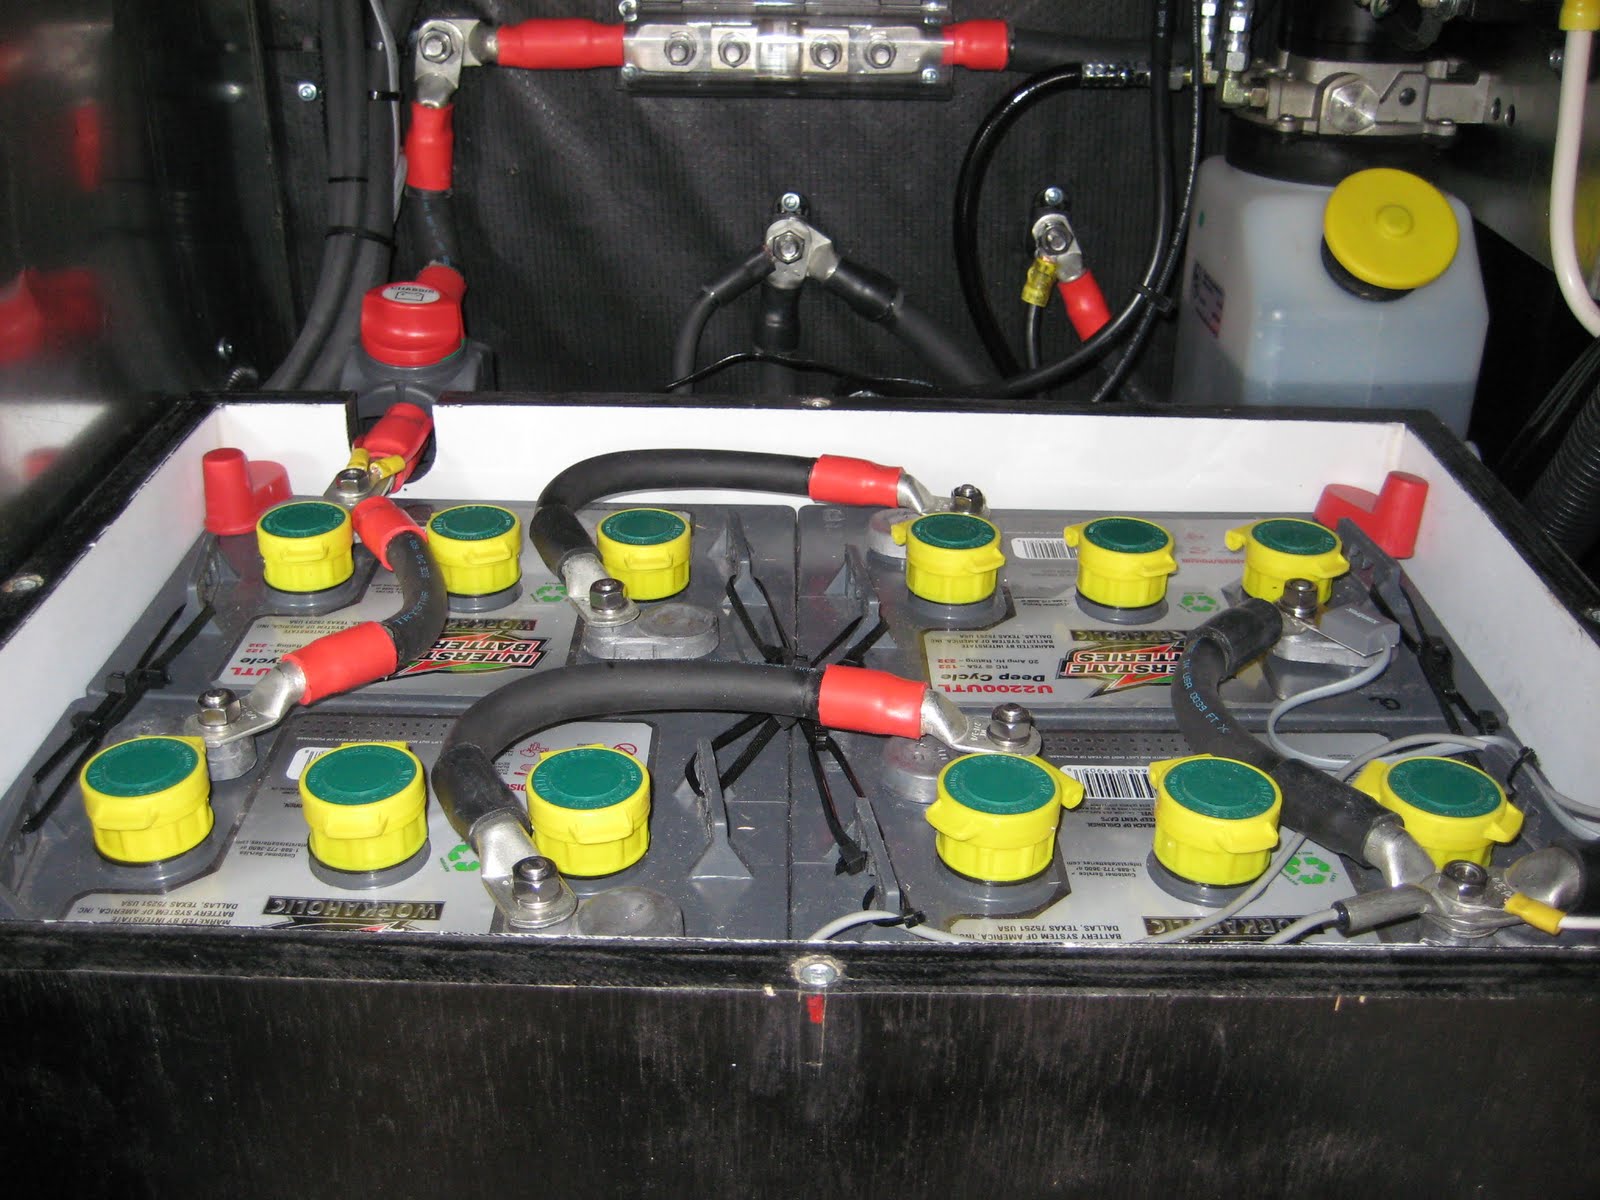 U2200 Interstate Batteries
These four Interstate U2200UTL 6 volt golf cart batteries are wired in series/parallel. I used #2/0 welding cable to interconnect the batteries. Coming from the Positive and Negative post is #4/0 welding cable. The #4/0 might be overkill but it does allow for expanding the system and helps keep voltage drop to a minimum. I made my own cables using lugs and a lug crimper. It made the job of running cables a lot easier. I don't think I could have run premade cables. The cost for the cables are reduced a lot also.
I had to create a battery box out of plywood because I could not find a battery box or plastic tub that would allow for 4 batteries to fit in the space available. The box had to be in two sections plus the top to be able to fit through the bay door. The front bottom of the box is bevel cut so it can be slid to the front of the bay and clear the hydraulic fluid tank.
The box is lined with Plas-Tex wall paneling. It is a plastic covering glued to the walls and bottom. I used The Battery Mat, a mat placed under the batteries which neutralizes any acid that might escape to the bottom of the box.
The 12 volt Interstate Marine/RV battery that came with the unit weighed 32Lbs. The Interstate 6 volt true deep cycle golf cart batteries weigh 60.5Lbs each.
The Coach Positive cable with the yellow crimp connector is attached to the power post with the red end cable to the left of the hydraulic tank for the slides.
 Multi Section Battery Box
 Hammer Lug Crimp Tool
Hammer Crimp Lug crimper, lugs and cable. Use anti oxidant compound in the lugs and cable end before crimping.
 Shrink Tubing
Triple wall shrink tubing color coded black for negative and red for positive connections.
 Tree Pruner
A tree pruner from Wal Mart came in handy to cut the monster welding cable. The wire cutter from Ace just did not have the capability to cut the large cable.
 60 Amp Air Conditioner pull fuse box.
This is a very handy box to use for the solar panels positive cable from the roof to come into one side and then out to the solar charger. Then from the solar charger back to the AC fuse box on the other side and out to the DC power post leading to the batteries. The solar panels on the roof can be disconnected simply by pulling the disconnect.
 2000 Watt Xantrex Inverter/Charger
This is the Xantrex Freedom SW2000 Inverter/Charger. It has a 30 Amp pass through switch and a built in 100 Amp charger. When plugged into shore power the AC passes through and powers the main power panel and the sub panel and charges the batteries all at the same time. The inverter/charger can be shut off with the remote switch and you can then charge with the solar panels and the charge controller or leave the remote switch on and charge with both. When not connected to shore power the inverter will power the sub panels four circuits with AC power.
When plugged into shore power and the 30 Amp breaker for the inverter is in the off position the inverter will power the four circuits in the sub panel from the batteries and the shore power will power the rest of the main panel circuits. This saves you $$ if you are metered.
My converter is unplugged and the breaker shut off. It could still be used if I plugged it in with an external cord. But not at the same time as using the inverter charger. The converter is really a battery charger. The charging from the inverter charger makes the converter unnecessary except in a case where the charging from the inverter/charger breaks down. Whew! Got to read all this again.
Those two double gang junction boxes on the back wall of the bay above the Inverter/charger are for connecting the #10 gauge wire for the AC power to and from the inverter. 1 box is for the in coming from the main panel and the other one is for the out going AC power to the sub panel. The boxes made it much easier to connect the inverter to the #10 ga wire.
At the time I ordered the price was $1199.00 at Boat & RV Accessories. Since then the price has probably gone up. Boat & RV Accessories is a great place to check out Inverter/Chargers.
http://www.boatandrvaccessories.com/INVERTERS-CHARGERS.htm
 Morningstar TriStar Charge Controller
The Morningstar TriStar TS-45 Solar Charge Controller. This is a PWM Charge Controller. After reading Handy Bob's Blog and Tioga George's Blog I settled on the TriStar. I felt I did not need a MPPT charge controller. The cost was probably less than half the cost of the more advanced MPPT controllers. I did spring for the extra $70 monitor panel for the front of the controller even though it was probably not necessary. The temp probe was also an addition. Along side the charge controller is the Air Conditioner Pull Fuse Disconnect Box.
http://store.solar-electric.com/trts12vochco.html
 Sub Panel
 Trimetric 2020 Battery Monitor & Inverter On/Off
The Trimetric 2020 battery monitor and the Xantrex Inverter/Charger On/Off switch I mounted above the existing controls over the steps leading to the bedroom. The Trimetric battery monitor gives about any battery reading you would need and is not all that hard to understand once you hook it up and read the instructions that comes with it. The inverter on/off switch is simple and does what I need it to do without getting into another monitor panel to setup. On/Off I like that.
Oh when you cut those holes in the wall, beware there is a wire bundle back behind there the size of your leg. An Exato knife saw is very handy to cut those holes and make a paper template with a tape stiffener on the back to mark your cut location. If you come up through the entry closet to penetrate the roof for the solar panel cables, beware there are several cables above the closet ceiling. Drill or cut very slowly and shallow.
A 500Amp Shunt is needed for the Battery Monitor to be able to take the necessary readings.
http://store.solar-electric.com/tm2020.html
 500 Amp Shunt
500 Amp Shunt on Negative side of batteries. The Coaches Negative (white cable) ground is attached on the downstream side of the shunt.
 Combiner Box
This baby is only three months old and I'm already putting holes in the roof. But the holes are sealed with Dicor 501 roof sealant. I used an AM Solar combiner box that I modified. The AM Solar box came with buss bars that would not hold my #4 welding cable leading to the charge controller. I didn't want to clip a few strands to fit the buss bar holes. So I had a distribution hub I picked up in Quartzsite that would take the larger #4 cable. So it was modify time. If I had known the buss bars were for smaller wire I would have bought an outside weather proof box at Home Depot and epoxied the distribution hub I had to the inside of it. Could have saved a lot of money. This distribution hub I used is commonly used in high power stereo installations. The AM Solar combiner box is low profile which will allow placing under a solar panel which is helpful if your panel falls over the combiner box.
 System Schematic
When making up cables I discovered it is best to measure or take the cable to where it fits and hold it in place to get the length. The lug ends sometimes need to be oposite each other to be able to fit right. Power Post are very necessary when making all the connections required. I actually ordered six and used four of them. I ordered more cable lugs than I thought I would need which was good because I wasted about six of them. That #4/0 welding cable is a bear to bend in short runs, # 2/0 is not all that bad.
I printed out Jack Mayer's solar information so I could refer back to it as needed. There are many questions that comes up during implementation of the system and his material has most of the answers but with room for one to make a decision for what is best for their circumstance.
Most of my system came from Northern Arizona Wind and Sun. Solar Panels, Charge Controller, Cable and Accessories, Fuses. Solar Products
Inverter/Charger came from Boat and RV Accessories. Inverter/Charger
Shrink tubing, power posts I ordered from Del City. Misc. Items
Solar Panel Mounts were ordered from Starlight Solar. Panel Mounts
 Solar Panel Mounts
There are several different types of panel mounts. I chose the mounts from Starlight Solar in Yuma, AZ. Pictured above is a set of mounts for one panel. They came with lag screws and tilt bars. The L brackets had to be drilled with new holes to fit the Kyrocera panels I used.
 Combiner Box Wired
 Panel J-Box Wired
 Solar Panels Up And Charging
And No Smoke!

Well done! Nice attention to detail. You did a lot of planning and it shows. WorkerB John
ReplyDeleteOne of the most talked about online batteries for inverter is the flat panel battery. These are the best inverter batteries for cities with frequent power outages. Speaking of plates, the positive and negative plates of FLAT PLATE batteries are geometrically flat. If you hear a constant hum when the inverter is in standby mode, it may be due to waveform deterrence.
DeleteIn short, if you have an old inverter based on technologies like square wave, then the hum of your equipment transmission is most likely due to the same reason. As a solution, you can upgrade the inverter to a higher rated sine wave inverter for the best backup power. Modified Sine Waves: These tend to be cheaper, but less powerful.
However, they are suitable for most everyday electronics you want to use, just not very large ones. Components of the natural environment such as solar radiation levels, ambient temperature and humidity are constantly changing. Therefore, the energy of the solar panel, which is generated and converted in a fixed manner, will not be sufficient to charge the battery.
Many electronic devices, such as timers or digital clocks, draw their power from the peaks of the positive and negative curves. However, the modified sine wave power charger has a flat line instead of a peak point. It causes double triggering. Therefore, their performance will suffer from this noisy and sudden sine wave. So the digital clock either runs faster or stops working.
A modified sine wave power inverter will work fine on most devices, albeit with some reduction in efficiency or power. Motors like refrigerator motors, pumps, fans, etc. will use more power from the inverter due to lower efficiency. Most motors will use about 20% of the power. For battery protection, you can also choose to purchase a household UPS battery cart that uses the highest quality plastics and uses relevant standards.
The Powmr family of three-phase Hybrid Inverter are designed to meet the requirements for reliability and quality of power supply in the most demanding applications in domestic/industrial/commercial establishments, which typically have three-phase power running heavy loads, elevators, lighting loads, and more. Solar panel current. The size of the solar controller is usually named by the current the solar controller can handle (i.e. the maximum charging current). In the market, solar controllers generally have three specifications of 10A, 20A or 30A. Some high power controllers can also handle 50A, 60A current.What's more, 80A solar controllers and 100A solar controllers are also common. What size inverter should I buy? We offer many different sizes and brands of power inverters. For specifications on each of our models, see our inverters page. Short answer: The size you choose depends on the wattage (or amperage) you want to run on (find the power consumption by referring to the spec plate on the device or tool).We all live in an age where it's nearly impossible to get through without the many appliances and gadgets that make our lives easier. The moment you lose power in your home or workplace, things stop. If you don't have an 24V Inverter in your home or office, this situation can leave you at a loss. Use a microwave with a power inverter. Use a photography flash with a power inverter. Use a laser printer with a power inverter. TV and audio recommendations. In areas with frequent power outages, the inverter must be faster Charge the battery for maximum backup power the next time the battery goes out.
DeleteLooks great, wish I had your talent for organization! Looking forward to seeing this project at Q!
ReplyDeleteRobbie
Very nice install, I am currently working on my own. I am having trouble finding a small sub panel like you used for the 4 breakers. I actually need the same size for mine (4 breakers). Where did you find yours? Also do you have a picture of the inside wiring hook up? Thank you! Joe
ReplyDeletehttp://rvshares.angelfire.com/why-does-my-rv-battery-die-so-fast.html This blog is really great. The information here will surely be of some help to me. Thanks!.
ReplyDelete